Instagram Feed

Since most of my updating is done via Instagram these days I thought I'd add a section that links to my feed. Click on any of the pictures to get an enlarged version. I hope you enjoy the pics:
Showing posts with label sewing. Show all posts

Tuesday, July 03, 2012

Okay...So...I'm Addicted! (Sarah Shoe #2)

Okay...so if you are like me...you'll understand...and if you aren't...you'll think I'm crazy!

I LOVE projects!  That is why my Aunt calls me the 'project girl'.  But the down side to being the 'project girl' is that when I have an idea or inspiration, I can't rest until I have tried it, solved it, done it...whatever!  

So, there I was laying in bed trying to sleep when I finally decided to give up and just get up!  I haven't had project induced insomnia for quite some time, though I did have pregnancy induced insomnia early on.  Fortunately, I eventually got away from the pregnancy type and have been sleeping well for many months.  However, tonight I had project insomnia. I was so stoked about the baby shoes that I kept thinking of how I could make them better, cuter, easier, etc.

So, what became of my project insomnia-tic restlessness:

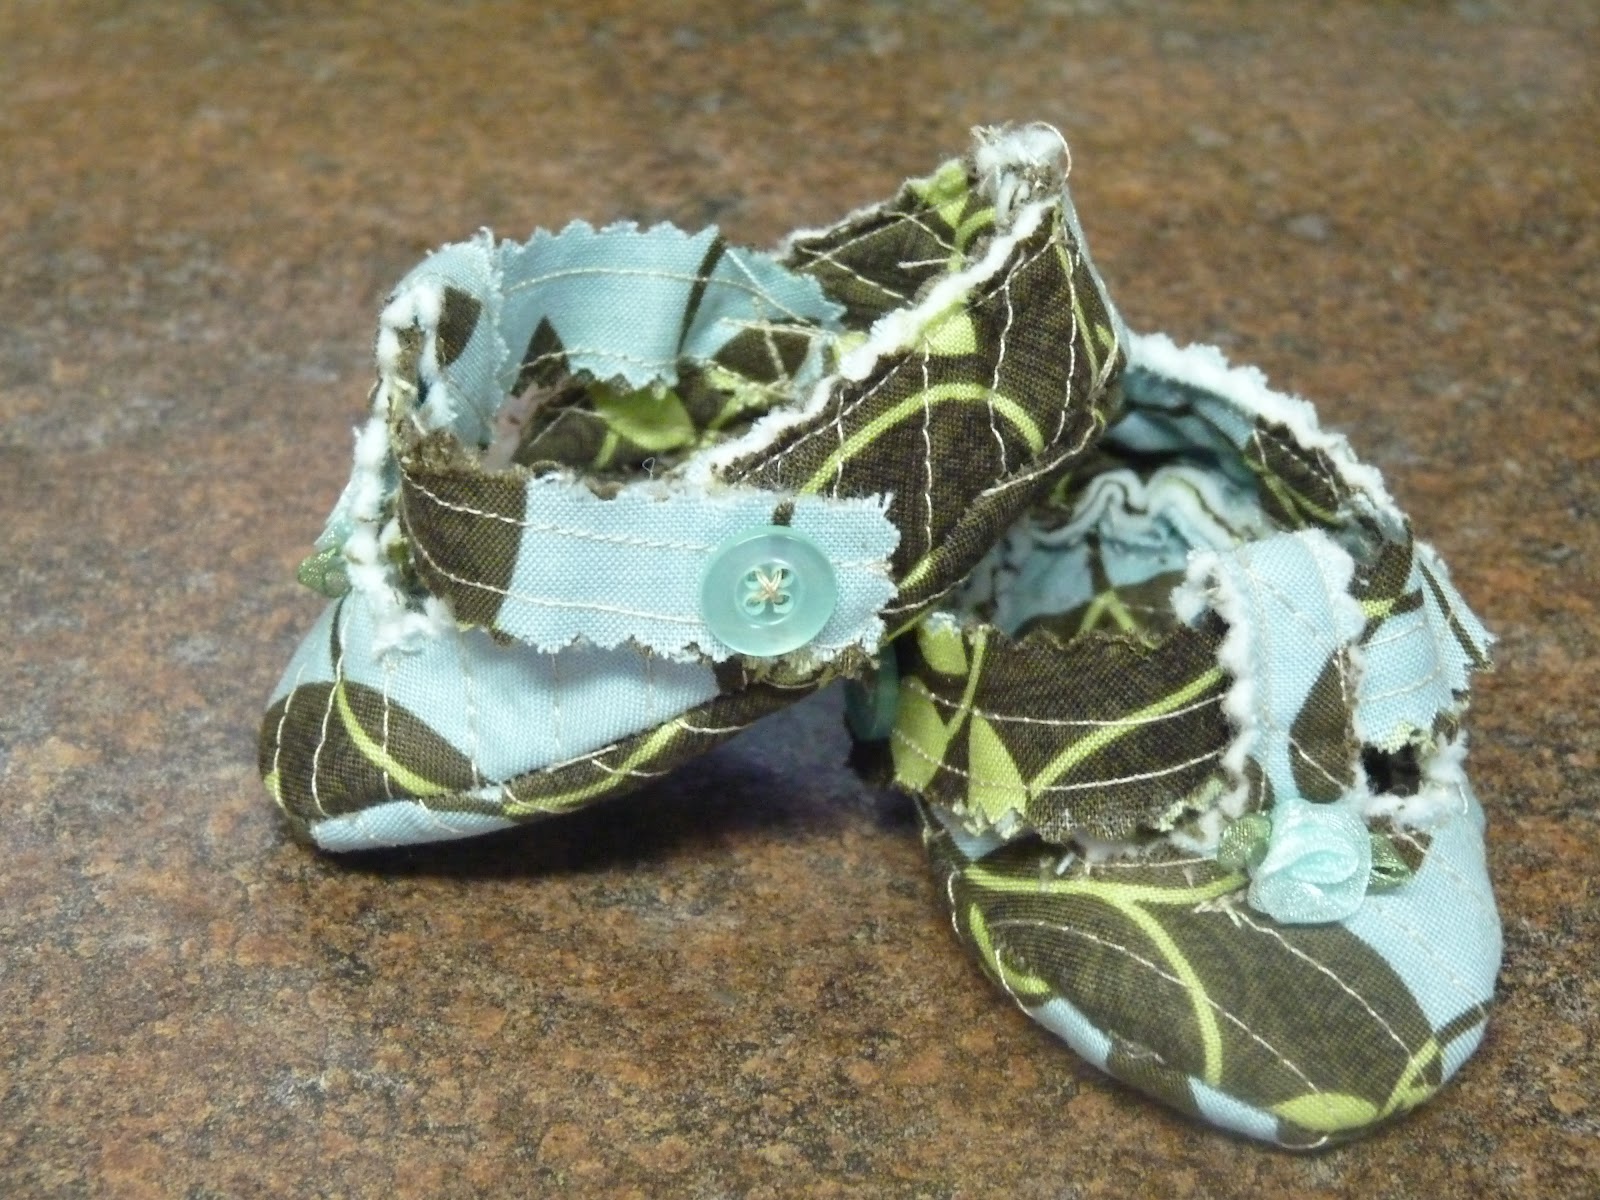
Another pair of Sarah Shoes:

Aren't they ADORABLE...
and SO much better than my first try!

The insides are a red that matches the outside...
though in the picture it doesn't much look like they match...
trust me...they do!

And this time...I used this GREAT tool my Sister-in-law H gave me some time ago....
It is an eyelet tool that worked PERFECTLY to put in these beautiful little flowers
for the lacing!
I am SO excited about these!  They look much more like the picture is supposed to...plus they will be somewhat adjustable with the ribbon ties.  We'll have to see how the ribbon holds up...I used the pinking shears to cut the ends off to see if that helps them not to unravel.

You can also see that this time, instead of pinking the edges at the top, I did the fold under thing. I definitely like this better.  I also didn't add the quilting to the top...only the bottom of the shoe...which was WAY easier to work with.  They still aren't perfect, but I like them SO much better than the first go around I think I can actually get some rest now.  Amazing how that works!

But first, they are just so cute you have to look at them again:

click on the photo to enlarge
Ooooo...I just can't wait to show Abi...she is gonna LOVE these!  But I promise, I won't wake her up to show her a pair of shoes...she can see them in the morning.  I have several more ideas now that I know how easy it is to do these (I whipped these up in less than an hour and a half).  But again, I promise...I'm going to bed now.  Really.  I promise.

At least, I think I can sleep now.

No. I promise.

I'm going to bed.

Really!

Good night!

Copyright © 2012 All Rights Reserved MMFarmlife - Melanie Schlatter

My First Baby Shoe Attempt

So, while looking for projects for Abi to do for fair, I came across this ADORABLE shoe pattern.  I will admit, my first attempt didn't turn out like the pictures, but I still think they are cute and I am betting they will look better on than just sitting on the desk!

Side view...the button is just for looks,
it actually attaches with velcro.

The original pattern has a second fabric for the inside.
I decided for my first attempt to just make inside and out the same.

I can't wait to try these on Sarah...
Abi tried to put them on her doll for us to take pictures...
they were too big.

I hand sewed these little rosettes on the fronts to help decorate the shoe a bit more....
plus hide the back seam for the strap.
Overall I am well pleased with them.  One shoe does look a bit smaller than the other, and I'm not sure I got the straps on the 'right' side of the foot...but for my first attempt.  They were fun!

If I get a chance to make some more, I'll try to post pictures of those too!  There are several 'versions' you can do (Abi will be doing one with a ribbon tie instead of the strap for the fair)...though I didn't buy all the patterns, I think I could figure out the other versions fairly easily.  We will see.

(Oh...and I used pinking shears on the edges as instructed, but I found some pictures on Make It and Love It of a pattern you can buy from her...from the pictures, it looks like you could do it without.  I might try a version like that too...we'll see.)

Copyright © 2012 All Rights Reserved MMFarmlife - Melanie Schlatter

Saturday, April 14, 2012

New Diaper Bag

My friend Marla made this amazing diaper bag that was HUGE and stayed on her arm as she was carrying things around.  I borrowed her pattern and made my own.  

I made a few mistakes in the process, but the overall product is usable and we like it (even if I misread a few instructions...lol).

So, here is the new diaper bag:


I did not add on the outside pockets but we have six pockets on the inside that are large and useful.  I can even put the iPad in one of the pockets perfectly!

Now we just need to fill it...lol!
Copyright © 2012 All Rights Reserved MMFarmlife - Melanie Schlatter

Thursday, April 12, 2012

A New Skirt

In an effort to try to get a few smaller projects knocked off the list and to provide Abigail with a few more skirt options to wear, I dove into a quick conversion from dress to skirt:

Here is what the dress looked like:

I cut off the top white part.

 Then I ironed a hem line and turned the skirt right side out.

Because I was using shirring, the right side had to be up!
Confession time.

I forgot to take any pictures after this.  LOL.

What I ended up doing was shirring the waistline down about 6 inches so it hugs and gathers around her waist/tummy area but will allow her to grow with the dress too.  Maybe sometime when she wears it I'll remember to get a picture and post it as an update here:


Bottom line...I got one more thing off the list and Abi does have a new skirt!  :0)

Copyright © 2012 All Rights Reserved MMFarmlife - Melanie Schlatter
Tuesday, February 28, 2012

New Bean Bags

Some of you may remember that the kids got Bean Bags for Christmas a few years back.  They love them and use them a ton...so much so that the vinyl was starting to crack at the seams in several places. I got to thinking that maybe it would be a good idea to get covers for the bean bags so that they would last a bit longer...but I couldn't find any!  Seriously!  I even went to the site we bought the bean bags from, but I couldn't find any covers that weren't like swede or really expensive stuff.

Just when I was about to give up, I found a free pattern online to make your own bean bag/cover.  I jumped on this because Ethan doesn't have a bean bag (he was too little at the time to get one).  So, I looked around and eventually went with fabrics.com.  I let the kids pick their own patterns and helped them coordinate them a little bit.

Well, we got the fabric and it sat....and sat....and sat....until yesterday!  I started off with Ethan's because I figured I would need to be able to practice a bit and his core bag wouldn't have to be perfect.  I did have a few mess ups on it, but it functions just fine.  Then I jumped into making his cover.

Ethan's Bean Bag
I was having a hard time trying to figure out how to take these pictures, but I guess you can get the main idea from them.  Ethan's bean bag is teal and yellow with pok-a-dots. The covers are bigger than the bags, but they have to be to get the bags inside of the small opening at the bottom.  And the kids love that they have more 'comfy' fabric on them.

After I finished Ethan's, I started on Jonny's - they used the same color of thread so I didn't have to change it...lol!  Jonathan picked a Cars fleece with orange and green dot fabric.  
Jonathan's Bean Bag Cover
By the time I got those two done...I was DONE!  I can only sew so long before my shoulders start to hurt!  But the other kids were begging to have their covers done, so today I finished them up.  I started on Abi's:

Abigail's Bean Bag Cover
She had picked the butterfly and pink plaid with a purple dot fabric.  She is definitely my girl!  By the time I got hers done, Nathan was really BEGGING me to finish his. So I went ahead and did his too:

Nathan's Bean Bag Cover
He calls his the 'turtle's in outer space' bag! Blues and Reds...that is Nathan for sure!  When I got them all done...this is what we have:


I'm very excited to have these projects done and crossed off the list.  And I have a ton of fabric left over, so I am thinking that maybe I'll make each of them a jumbo pillow out of their fabrics so they have matching sets....we'll see...right now I don't want to sit at the sewing machine for a little while! :0)


Copyright © 2012 All Rights Reserved MMFarmlife - Melanie Schlatter

Saturday, November 19, 2011

Project Day - Scarfs

Today I started off doing some sewing for the Christmas Program coming up in December.  We have several adjustments to make to the costumes this year and so I started working on that.  However, it wasn't long before Abigail was asking if she could finish the Scarf project we started a few weeks ago.  Unfortunately, the original idea wasn't working so well, so we revamped the idea and started over.  Abi wanted to make scarfs for the cousins that we had drawn names for.  So, here she is hard at work:

Fortunately the scarfs were long straight stitches
so she could handle that all by herself.

She has learned how to adjust the fabric so that it stays straight.

Hard at work all on her own!

The finished products...

She was very excited to have made all these - including some for herself!
I know it is just a start but it is so much fun to see her eager to learn things like sewing and baking.  It is hard for us to believe that she is already grown up enough to start these projects!


Copyright © 2011 All Rights Reserved MMFarmlife - Melanie Schlatter


Wednesday, August 24, 2011

SHIRRING...

My friend Beth has sewn several dresses that have a shirred top.  I asked her the other day how she did that and honestly - she said she bought the material that way...lol!  I've been thinking there are several things I could do with shirring (though I just recently found out that it is called shirring).

Sleeves, waist bands, decorations...etc...

photo credit to Ruffles And Stuff

Anyway, here is a great tutorial that I found on how to shir:

Shirring Tutorial


Now I just need to find some elastic thread...I'm thinking I'm taking a trip to Stuff 'n Such in Downs...real soon!

Tuesday, May 10, 2011

A Few Recent Projects

In an effort to clear off my dining room table (again) I decided to tackle a few of the projects that were sitting around waiting for me to get to them.  The first project I did was another t-shirt dress for Abigail.  It is so exciting to be able to make a new outfit out of material that cost us NOTHING!

You can see the small strip of green that I added.
You can't really see it unless the tail of the shirt is lifted.
The next project I did was to convert a pair of Capri pants into a skirt.  I wanted to see how hard this would be.   And it wasn't that hard, but I do think I needed to go up higher in the crotch to make it lay better.
The fabric looks really black here, but it is a green that matches the butterflies pretty well.

See the pretty butterflies...I just had to try to save these!


And my last project I did today was the basket liner.  I had read how it was terrible on baby's tummy's to have all that string laying around and I have to admit that I don't like to have Ethan around all the strings and stuff, so I bought a basket and made a liner like what Ashley from Make it and Love it does here.  My basket had handles so I had to make inserts for them, and I wanted my basket to have some elastic to keep it on.
You can see it is already being put to good use!
I've still got a jumper to alter, and a skirt to make for me, and a jumper dress to design for Abi.  Then my table will be all cleaned off.  We'll see how far I get over the next few days.  I've also been working on the flower bed out front, but I can only do that for so long before I need a break inside!  lol

Saturday, March 26, 2011

Another T-Dress...Love This one!

After looking through all the extras we have...I found a green tee that matched the stripes in a tee she already had and wallah!  I went ahead and added the second white layer for extra length and then added the frilly colored rosebuds and she love its (as well as do I)!

The bottom of the green is a loose layer but it doesn't really show so well.


I've got one more tee to make into a t-dress and then she'll have a few more fun summer dresses.  We also found TWO jean skirts in her closet upstairs...they needed minor adjustments in the waistline but she is very excited about those.  We had to wade through like 10 pairs of jeans to find them, but I thought I remembered some skirts up there.  So, she is starting to get lots of options to wear (far more than mommy...lol).

I can't tell you how it warms my heart to see her come down stairs all dressed and ready to go for the day.  Several times I've asked her why she chose what she is wearing for that day and the response is almost always the same, "I wanted to wear this cuz it make me fell like a girl."  Since she is a girl amongst many boys, I'm glad a simple thing like what she wears can help her find that peace.

Friday, March 25, 2011

My Camera Died...

Yep...it is definitely broken.  No more flash...Grainy Blurry Dark Pictures.  Yep..its a goner!

Fortunately, Abi's camera still works so I was able to get the pictures of the t-shirt dress that I made her yesterday. Here they are: (you'll have to forgive the hair...apparently we aren't doing very well with getting that taken care of before the pictures...lol)

So you can see the original t-shirt the orangish red color...
then I took a brown t-shirt and lengthened the skirt, sleeves, and made the neckline more modest.
I then had some of this woven ribbon to just a a bit of 'trim'.
On the back here...you can see how it had a tie opening around the neck...it offers some extra 'frill' for Abi!
 Really it is a bit too big for her, but she'll be able to grow into it nicely.  She seems to really like it and that is all that matters to me.  Seriously...a dress that cost absolutely nothing to make!


As far as the camera issue goes...I'm in the market for a new one.  I'm gonna look around a while and see what fits us best.  I'd love to have a camera with a fast shutter speed, good quality image, and doesn't cost and arm & leg!  Really, those are my qualifications for a good camera!

Monday, March 14, 2011

Abi now has one too...

Okay...I just couldn't refuse...and as soon as I can get a pattern drafted, E will have some too...then I'll get a picture of all four of the kids in their flaming jammies!  (and I just might have enough left over for Nathan to have another set when he out grows this...but that might be tight...we'll see.)

Please forgive the hair...it is late and been a hard day of play!

It's just a night shirt...I just added the flaming material at the bottom.
Look at that smug expression...she is very 'proud' of her new jammies too!
Fortunately, she has lots of room to grow into these as well.  They are rather narrow but what harm is that when you are sleeping!  Stay tuned for E's flaming jammies and the group picture....

Sunday, March 13, 2011

New Jammies with FLAMES!

Well, here they are....the flaming jammies!  

the neckline is a bit smaller than the other ones but still has plenty of room.
you can see that he can grow into these!
Then, I had plenty of material left over, so I made some flaming jammies for Jonathan...started and finished them today.

excited for his jammies...and ready for bed too!
The Flaming Brothers!
I told Marion that they were just so stinking cute....I just might have to make some flaming jammies for Abi and Ethan just so they can all match...wouldn't that be just too cute!

Wednesday, March 09, 2011

My version of the Peasants dress...

As I may have told some of you, I have these two dresses that I just LOVE!  They are called a peasants dress though they are not quite like some of the other peasants dresses I've seen.  One think I did not like about the dress was that the neckline was rather low, so I tried to correct that and make the neck a bit different.  Here is my version:

I think the next time I'm going to lower the top part down a bit more, and the sleeves seem awfully big  in the cotton fabric...apparently they hang differently with a knit.


I also added a tie string to the dress...here it is just loosely tied,
but I figured as I needed to I could adjust the tie string for a more comfortable fit.
I love the dress, but I have to confess that now that it is done....I like the skirt better.  At least now I've tried both and I can pick and chose which I want more of.  I've got some great, colorful fabrics so we'll see what I come up with next.

I think my next project with be to finish Nathan's flame jammies and then I may try to make Jonny some jammies too (though I don't have an actual pattern for his size).  And at some point in time, I want to make another one of the pioneer dresses for Abi using this adorable pink quilted fabric I have.  As you can see...there are LOTS of projects at hand...its good to stay busy!

Monday, March 07, 2011

I'm so excited...I can't wait to show you....

though that above statement is true...I also have to ask that you forgive the pictures...Abi was helping me take them and I inadvertently showed my tummy a bit...sorry! So, please look past the pictures to the SKIRT in the pictures...LOL!

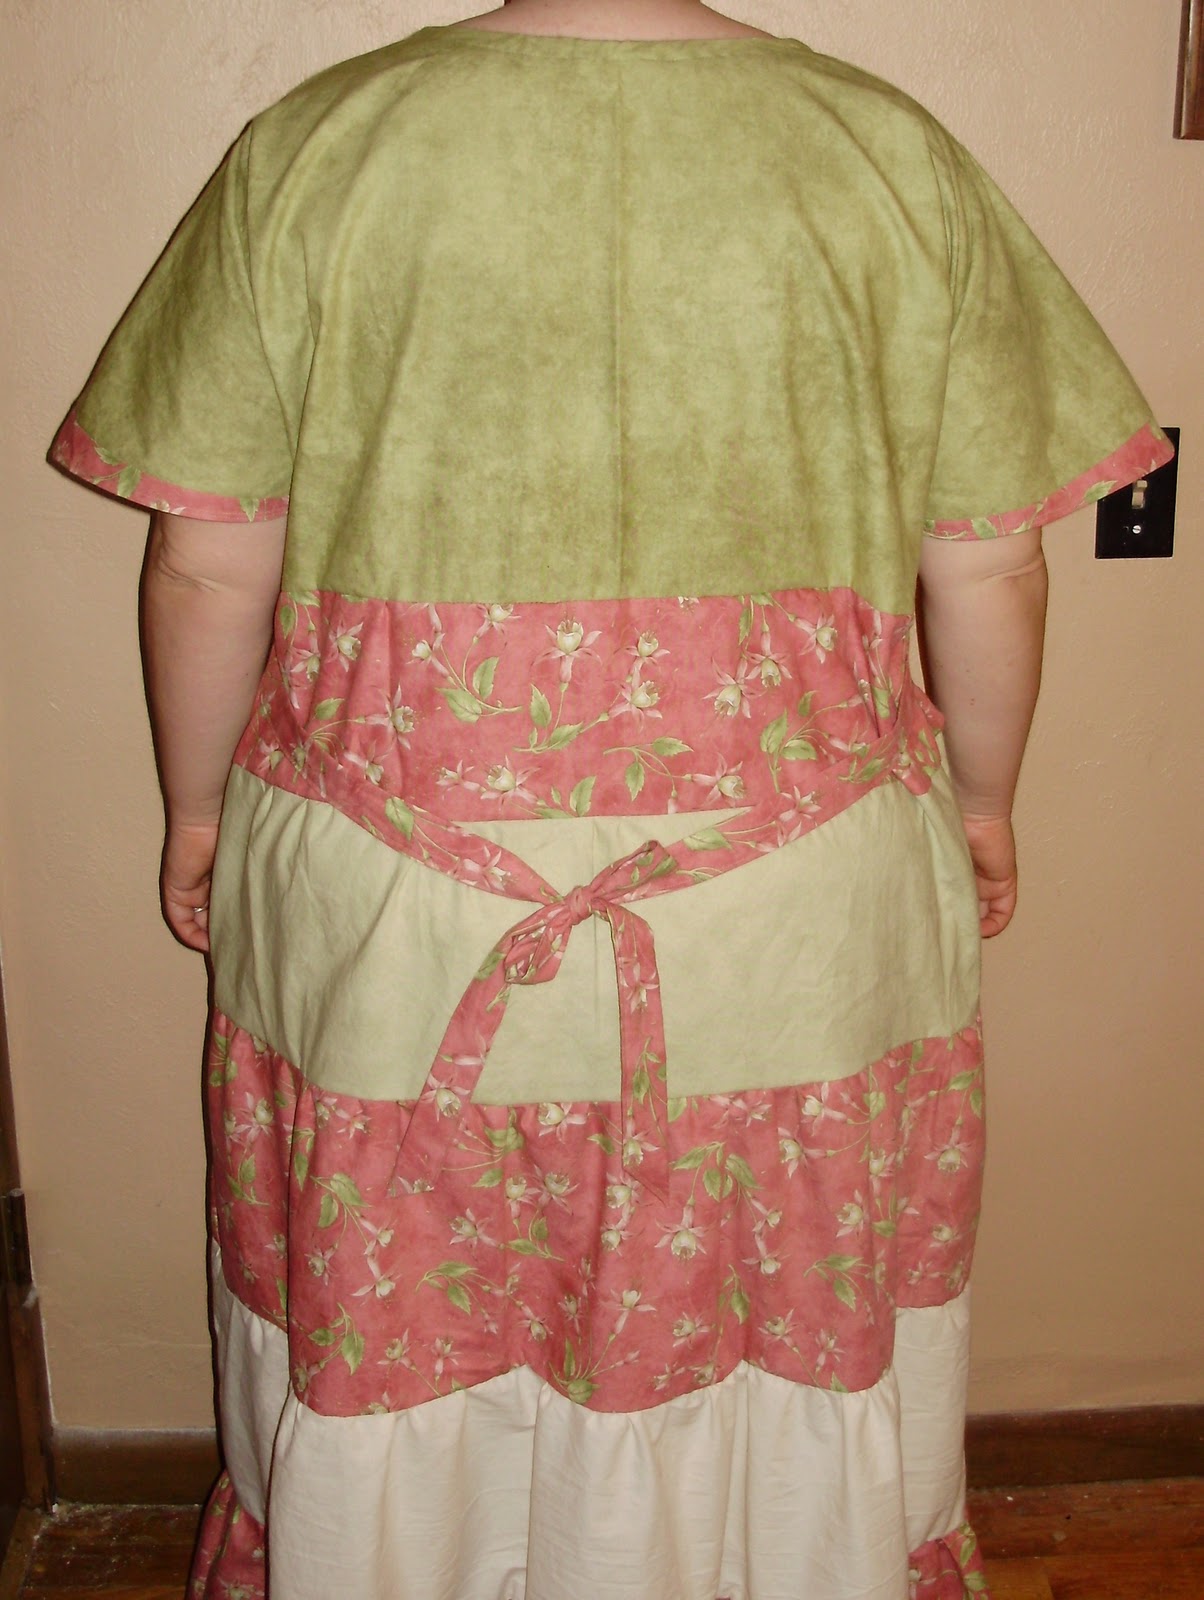
SO....I actually got my first TIERED skirt done today!  And I LOVE IT!  As with all my projects in hind sight I'll do a few things differently with the others...BUT only one:  I'll mix the flowers in a bit more instead of the two solids!  I actually had more of the floral print than the others....but I was thinking....3 fabrics....layered in 1-2-3...wasn't thinking that the two solids in the middle wasn't the best idea....LOL!  I should have done floral on the bottom, then the cream, then the floral, then the green and top the waist with whatever I had left...:0) But considering some of my other projects...I think this one came out one of my FAVORITES!
It's hard to see the tie string, but I didn't go with elastic on this....
I think it gives it a more custom fit...I can wear it loose enough to be comfortable, but it doesn't fall off!


Abi insisted on this view as I always take a back picture of her dresses...
I don't know if you can tell, but I pleated the bottom tier and gathered the rest....
I kinda like the pleated look....but it takes FOREVER!

I can't really think of anything else to say about it....
I just really like the flow and feel of this style...and it turned out ALOT better than my last skirt...rofl!
:0)

Tuesday, March 01, 2011

Nathan's Jammies - A day off from the wall

I woke up this morning rather sore from the priming yesterday and decided to take a day off from the wall to get some other things done.  I had started the laundry yesterday but figured if I focussed on it I could get it wiped out fairly quickly so I tackled folding the laundry and getting it put away!  YAY!
I also finished Nathan's Jammies that he so desperately wanted!  Actually...they are not the 'flame jammies' he wanted, but I wanted to do a 'trial run' before I cut into his 'good' fabric!  So I let him pick from the fabrics I had and he decided on the beach top and whale bottoms:


The very proud 'I finally get to pose' Nathan!

They look more like hospital scrubs than anything but he says they are very comfy!

I chose not to put in elastic but to do a draw string instead...I kinda like the drawstring better!

He said we needed a side view!

You can see that they are a 'bit' too big but that is the way I wanted them...so he could 'grow' into them.  The pattern I have actually starts at a 7 and Nate is barely in 5/6s so I shortened the pants and shirt, but the neckline was still way to big for him.  But, now that I have the pattern pinned appropriately, I feel more comfortable tackling the flaming jammies when I have my next sewing day.  And yes, I will be trying to alter the neckline for those!

I was also able to make one skirt for myself out of a blue calico that I had purchased.  I was wanting a more all purpose skirt so that I could utilize the various shirts I currently have.  It turned out fairly well considering I just took a pattern from another skirt I had.  I only made two mistakes...neither made the skirt unwearable for home stuff.  (I'm gonna have to remember that when making a pattern from an outfit with elastic that you need to STRETCH the elastic to get an accurate pattern...lol...I have to put the skirt on over my head because I forgot that...LOL)

:0)

Saturday, February 26, 2011

Dress #4 My Version

I saw this great little dress called the Village Frock (first made and patterned by Sugar City Journal).  Another blog I visit had revisited the pattern and stated that they no longer printed the actual patterns anymore (and of course are all sold out).  This style is NOT really my thing, but for some reason, it clung to me to recreate this design.  So, starting from nothing (or just Abi's jammies for a basic pattern) I decided to create this Village Frock the best I could.  It was quite the process and I see that I messed it up a bit..but hey...we have another dress anyway!

This is what it was SUPPOSED to look like.  
Now, let's take a look at what I created.  I don't know why I didn't print the picture out...lol...maybe I'll get creative and try it again with different colors.  Anyway, here is what we did:

Please forgive the messy hair...we've been playing hard and trying this dress off and on all day!
 Okay, the first thing I see that I did 'wrong' was that in the original there aren't the 'shoulder/sleeves'.  It is just a long open neck.  The other thing I see that I did 'wrong' that the gathered sleeve is supposed to be on the bottom and the straight on the top - I tried to reverse that.  I also need to learn how to put MORE fabric in the pattern I create so there is more gather!

From the pictures, you can see that I had to 'add in' several times.  Like the hot pink hidden pleat on the side. The original skirt I made restricted her walking too much even though I had THOUGHT I had tapered it enough.  I also had to reconstruct the sleeves a few times to get them so they weren't too tight.  AND the binding was VERY interesting.  It was the first time that I cut my own bias from the fabric I had and trying to figure out how to finished the edges was FUN!

The back isn't very appealing to look at.
Like I said, at least it is functional for a play dress!

Here is a good look at the side panels.  The hot pink matches the buttons we used.

I don't have a WIDE variety of buttons, so I used the hot pink ones we had on hand.
Don't look too closely, that bias is a MESS!  It was insane trying to put the loops on.
Abi says she likes it and will actually wear it.  We will see if she does.  I guess the main point is that I tried something new and creative and it is functional even if NOTHING like the original.   ROFL!  I still LOVE the Villiage Frock...I just might have to try again!

Now I am off to sand down the wall and put on another coat of joint compound.  Hopefully we will be able to start priming and painting early next week!  YAY!