Instagram Feed

Since most of my updating is done via Instagram these days I thought I'd add a section that links to my feed. Click on any of the pictures to get an enlarged version. I hope you enjoy the pics:

Tuesday, February 28, 2012

New Bean Bags

Some of you may remember that the kids got Bean Bags for Christmas a few years back.  They love them and use them a ton...so much so that the vinyl was starting to crack at the seams in several places. I got to thinking that maybe it would be a good idea to get covers for the bean bags so that they would last a bit longer...but I couldn't find any!  Seriously!  I even went to the site we bought the bean bags from, but I couldn't find any covers that weren't like swede or really expensive stuff.

Just when I was about to give up, I found a free pattern online to make your own bean bag/cover.  I jumped on this because Ethan doesn't have a bean bag (he was too little at the time to get one).  So, I looked around and eventually went with fabrics.com.  I let the kids pick their own patterns and helped them coordinate them a little bit.

Well, we got the fabric and it sat....and sat....and sat....until yesterday!  I started off with Ethan's because I figured I would need to be able to practice a bit and his core bag wouldn't have to be perfect.  I did have a few mess ups on it, but it functions just fine.  Then I jumped into making his cover.

Ethan's Bean Bag
I was having a hard time trying to figure out how to take these pictures, but I guess you can get the main idea from them.  Ethan's bean bag is teal and yellow with pok-a-dots. The covers are bigger than the bags, but they have to be to get the bags inside of the small opening at the bottom.  And the kids love that they have more 'comfy' fabric on them.

After I finished Ethan's, I started on Jonny's - they used the same color of thread so I didn't have to change it...lol!  Jonathan picked a Cars fleece with orange and green dot fabric.  
Jonathan's Bean Bag Cover
By the time I got those two done...I was DONE!  I can only sew so long before my shoulders start to hurt!  But the other kids were begging to have their covers done, so today I finished them up.  I started on Abi's:

Abigail's Bean Bag Cover
She had picked the butterfly and pink plaid with a purple dot fabric.  She is definitely my girl!  By the time I got hers done, Nathan was really BEGGING me to finish his. So I went ahead and did his too:

Nathan's Bean Bag Cover
He calls his the 'turtle's in outer space' bag! Blues and Reds...that is Nathan for sure!  When I got them all done...this is what we have:


I'm very excited to have these projects done and crossed off the list.  And I have a ton of fabric left over, so I am thinking that maybe I'll make each of them a jumbo pillow out of their fabrics so they have matching sets....we'll see...right now I don't want to sit at the sewing machine for a little while! :0)


Copyright © 2012 All Rights Reserved MMFarmlife - Melanie Schlatter

Saturday, February 25, 2012

Making Candles!

I know I haven't blogged about it...mostly because I don't have any pictures to post about the day...but last week Nathan, Abi and I went with the Homeschool group to the Stuhr Museum in Grand Island.  They had two groups and our kids joined the 1888 School Day event.  They got to be apart of a day in a prairie school! After the day was over, we got to go with the 'big kids' and make candles.  I was actually more excited than the kids were until they got going. 

Having seen how they did the candles, I came home thinking one day we'd do some candles too.  Today was that day!

I melted down a bunch of old, burnt out candles and votive and some melting pot squares that I had.  Marion said the kitchen smelled awesome! 

Because we were using a quart jar instead of a big coffee can (mostly because I didn't have that much wax and wanted to use something that was tall and narrow) we didn't do a double candle...we only did singles, but the kids managed to make 12 candles!

Waiting in line for their turn.

going from the wax to the water


So, are you wanting to make  your own candles...here is the process:

1. Find some wax, melt it. (it is recommended to melt it in water to keep it from catching fire.  I had a jar ring below the glass jar to keep the water moving so the jar wouldn't break)

2. Find something for a wick.  (I used three cotton strings tied together.  We tested it and it worked, but you can also treat your cotton twine to make it burn better...check out this site for directions...We found that a single cotton string only gave off a little light...the three twisted together gave off more.)

3. Fill a glass of water - possibly ice too! 

4.  Dip your wick into the wax three times...and then into the water.

5. Run your fingers down the wax to straighten it and loosen any flakes. 

6.  Repeat step 4 and 5 until you reach desired thickness. - trim off bottom if you desire.

Copyright © 2012 All Rights Reserved MMFarmlife - Melanie Schlatter

Wednesday, February 22, 2012

The Writing on the Wall...

Sitting Room Renovation/Decoration

LOL...no...this isn't some very profound new revelation...though that would be cool...no...this is more renovation stuff...lol!

So, here is the story:  For a long time now, I have been wanting to get some of those all so popular wall stickers that say cool things and have deep meanings...but...I didn't just want anything.  I actually saw a sticker I liked once but wanted to 'tweak' it.  But when I looked into what it would cost to 'tweak' it...it was like $250!  So we didn't do it.  I can't justify spending that kind of money on wall sticker!

Well anyway, as I was working on the kitchen I realized that I really needed to get something to transfer the growth lines for the kids from the door jam so that I could paint over it...and since this is like the second or third time I've had to do that I realized it would be better if I just bought/made something that could be removable...

That is when I found MyGrowingChild. I shopped around and decided to buy a vinyl wall hanging growth chart (though they offer lots of different kinds).  As I shopped around, I found that they do letter/word stickers too and I immediately started calculating how much it would cost for me to get my 'phrase' that I wanted.  It was only around $28.00!  I could do that!

So I placed my order - for the growth chart and the word stickers!  It wasn't long after I submitted my order that I got an e-mail from the owner - Krystin - asking me a few questions and making a few suggestions.  Her customer service and attention to details was AMAZING!  I would highly recommend her for any decorating, stickers, wall charts...etc!  They have a TON of fonts and sizes...check it out here!

Anyway...here is the phrase on the wall:


A larger picture of just the phrase.
I LOVE it...lol!  I think the "LOVE" is a bit crooked and I need to probably fix that...but that is the great thing...they are repositional but STICK great!  I will say the font I chose was very 'thin' but it still wasn't hard to apply the letters!

Well..I better get back at it...I think today I might break out the primer and get busy with the rest of the kitchen...I keep hoping that I'll get a little more energy and break from the morning sickness now that I'm in the second trimester!

PS...I got a chance to do some writing and Chapter 7 is now complete...I will be posting Travane on Friday!

Copyright © 2012 All Rights Reserved MMFarmlife - Melanie Schlatter

Wednesday, February 15, 2012

Problem Solved - Corn Tortillas

Yay...I got my corn tortilla problems solved!

A long time ago, I bought some Masa Flour to try to make Corn Tortillas, and they just NEVER worked.

At first, I tried them without the press...just rolling or pressing them with a pan and wax paper.  That REALLY didn't work.  They would never press out correctly...stuck terribly...and were just awful to make!

Then I got a tortilla press and I thought my problems would be solved...but they weren't.  They would still either press out so small and thick OR be splattered to smithereens! Now, my family doesn't usually eat corn tortillas...so the main reason I wanted them was to make corn chips - we do eat lots of those!  So having the tortillas in smithereens wasn't all THAT bad...but some of the pieces were pretty small.

So, I kept working on trying to figure out how to get these corn tortillas to work.  And what was my solution?

OIL

Yep.  The Masa flour instructions say to just add salt and water.  But I found if I add just a tablespoon or two of oil...I get awesome tortillas!  I can then make them into chips or use them in tacos or I'm even working on making them into shells to use in a double decker taco!

I'm so excited! I just had to share...oil made all the difference in the CORN tortilla dilemma!


Copyright © 2012 All Rights Reserved MMFarmlife - Melanie Schlatter

Sunday, February 12, 2012

Kitchen Renovation - Installation of Desk

Yay...the desk is IN!

Yesterday afternoon, Marion took the time to help me get the desk installed:

pre-drilling the holes for the legs

Installing the leg hardware

setting the table up 

installing brackets underneath

Totally installed
One thing Marion was concerned about is the far end leg.  He was very concerned the boys would be rough housing, slide into it, and bend it or break it off...SO, we added a screw to the floor, snapped it's head off, and set the leg on top to help secure it a bit more. The middle two legs are just weight bearing.

This afternoon I was able to get the computer area set up.  I was very happy to be able to get the hard drive on the floor and the keyboard installed.  (we have gone months without a keyboard holder...we've had to just type on our laps...SO NICE to have a holder again)


As you can see, the desk is already filling up.  It will serve as an additional space to eat as well as desk space.  I added the mini-cubbies that we'll use for supplies - camera storage - etc. Most of the stuff on the desk top needs to be sorted into the cubbies and is stuff that was in the drawers previously in the cupboard that used to be here.

There is of course alot of work still to be done: priming, painting, trim & accents, but we are at least making headway!

Copyright © 2012 All Rights Reserved MMFarmlife - Melanie Schlatter

Tuesday, February 07, 2012

Kitchen Progress - Renovation

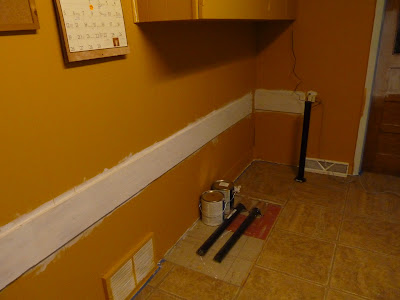
Today we started on the new kitchen desk area.  Yesterday Marion was able to go down to Koster's Lumber in Cawker City and get the cabinet top we ordered from them.  It is VERY heavy and so right now it is sitting in the building on a pickup bed.

SO, if I want to get it into the house, I'm going to have to start getting the kitchen ready for installation. That means today was demolition day.

Desk Area before destruction
 
Marion helping with the demo...
Honestly...I forgot to take a few of the pictures along the way...but you can still see the progress made.  Below, I have already started painting, but you can see the cabinet is torn out.  We will have to call the flooring guy to come fix the spot where the cabinet used to be.  We have the tiles, but not the sub-floor nor the adhesive we need to do it ourselves.

First coat of paint going on.

Whole wall photo
For the time being, we are only working with the corner area where the new desk area will be.  I'm not worried about trims, details, or accents at this point.  Our number one goal is to get the desk installed so we can get the computer put back.  Right now the computer and printer are all stacked on the dryer and counter by the door.  I was able to keep it all hooked up so we can use it, but it will be nice to have it back where it is supposed to be.

Below you can see the wall bracket primed and the three legs that will go under the desktop.  I am hoping that tomorrow I can get that brace painted yellow and Marion can get the other brackets he wants so we can get it all installed.  I'll keep you posted.


I'm very excited about it all.  I also want to try to do the pinstripe tomorrow if I can to see if it is even possible.  I think I will try it down at the bottom so that it will be less seen if it doesn't work - easier to hide the mistakes.

Copyright © 2012 All Rights Reserved MMFarmlife - Melanie Schlatter

Monday, February 06, 2012

Snakes Alive....

Yep...you've got it!  We've got snakes again!

Marion woke up this morning and went to get his clothes and lo and behold...there was a pencil sized baby bull snake curled up under his clothes sleeping way!  Apparently he turned on the light, beat it with a shoe AND carried it outside without me even waking up...must have been God's divine provision!

Anyway, so first thing this morning, Marion was giving the kids snake 101 lessons...and offered a huge $5.00 reward for every snake they find! He has given them specific instructions and the kids are actually kinda excited about the 'hunt'.  Since the snake was a small baby there is a chance there will be more that surface...especially since Marion just put a ton of mouse killer downstairs and their food supply is now gone.

You'd think after about 9 years of living here, I'd be used to this, and I have to say some of the SHOCK has worn off, but still...it grosses me out!  Thankfully we think we have everything sealed off to keep the mother out...apparently it is only the really small things that can get in.

Snake Count 2012 - 1

Copyright © 2012 All Rights Reserved MMFarmlife - Melanie Schlatter

Thursday, February 02, 2012

A Good Day...

Don't you just love good days?

Don't you just wish everyday could be a good day?

I know I do. When you feel sick, or there are so many problems you can't count them all...it doesn't make for wanting to repeat those kind of days. But, when you have a good day, you want to repeat them...over and over!

Well, today was a good one - despite the rambunctious boys who wanted to bicker and fight, and besides the 1 year old who is into EVERYTHINg...and I mean that literally! We kinda got a slow start to the day because I couldn't sleep last night....crazy pregnancy insomnia...so my wonderful hubby let me sleep in...I think it was around 7:30 when I finally got up and headed for the kitchen to see what kind of a mess I had.

But, Abi was working at cleaning up breakfast and the boys were already started on chores...yaya..good start! After Abi got the table cleared, I got out the wheat grinder to make flour. Marion has been asking for wheat flour for awhile now, but I never do it in small doses...we usually do at least a 5 gallon bucket at a time so today was the day!

While that was working away and in between school instructions, I started some bread...since we'd have flour...lol...and decided to get rid of the bananas in the freezer too by making some banana bread. By about 11:00 I was finishing up the wheat and Marion came in to ask if I could help move him around, so we put everything on pause and helped him. By the time we got home it was past lunch so I tried to quickly put some spaghetti together on the table and finish the breads I had started.

Then I got this crazy idea...since the grinder was out...why not try cornmeal. I had always wanted to try cornmeal...why not today...so I did! And then, I made cornbread out of the cornmeal! We hadn't had cornbread for a long time.

By this time, I was getting tired, so with the last of the breads in the oven, the two younger kids napping, and Abi set for afternoon school, I took a nap (don't worry, Abi shut off the ovens for me when the timer went off...just a tad bit early so that they didn't get overdone).

After my nap, I decided to get the apples from my refrigerator out and get them going in the dehydrator. So with Abis help, we cored them, put them through the processor and into the dehydrator. Then I sat down for a little bit before dinner. We had cornbread for dinner...and rushed out the door for piano lessons.(yes...that was it..just cornbread and honey...we try to eat light in the evenings and the kids had a late lunch mixed with hard boiled eggs for a snack...so I don't thinK they'd starve. Besides...that WAS all they wanted! Lol)

The boys were pretty naughty so when we got home...straight to bed for them. Abi was tired so she headed to bed too, and here I am...just crawling into bed myself. What a good day. The only thing that would have made it better would have been to see Marion more. He was so busy today I barely saw him and had a commitment this evening and is still gone for that. But at least I'll know when he gets home...the bed will be a lot warmer! :-)

Wednesday, February 01, 2012

My New Best Friend - Renovation

or at least an AMAZING product....LOL!

Okay...so several days ago, I was talking to my mom when she asked me, "So what ever happened to the kitchen project you were going to do?"

LOL

Exactly...what ever happened to it!

Well, sickness happened to it...and pregnancy...yep..you read that right!  If you haven't heard yet (which would be amazing in itself...hehehe) we are expecting #5 in August...but that is for another post!

So, a few days ago, I started feeling better and decided to get on it!  I'll do another post about the backsplash that we now have, but what I really wanted to talk about in THIS post...is this amazing stuff right here:

METALLIC PAINT
An amazing product to say the least.

You see...I have this thing for silver...nickle...brushed...I'm not really that particular, but I like silver!  So, when thinking of remodeling or changing things...I always have a tendency toward silver!  BUT, some things just can't be 'replaced' or it isn't cost efficient to do so...but now with this handy dandy stuff...I can have the best of both worlds!  Wanna see what I mean?

Many of you probably know that I was once a Pampered Chef Consultant...so here is my Pampered Chef Tool Turn-about...it used to be WHITE...(I know they make black ones now, but mine was the old fashioned white one and I couldn't see spending the money for a black one when the white one works just fine...so, now it looks like THIS:


White Tool-Turn-About painted metallic Nickle Silver!
Okay...so that turned out SOOO cool looking, I thought, I wonder if it would work on the chandelier in the Sitting Room?  (You see...I've been asking for an updated light in there for awhile, but Marion just couldn't see spending the money to update something that worked just fine - especially at the cost of what a new chandelier would be - just because its old doesn't mean you get rid of it!)  I got out some tape and covered the floor and climbed my ladder!  

Old Brass and Wood Chandelier painted Nickle Silver!
 Doesn't it look AMAZING...now...we will be getting new globes.  I had previously purchased a couple light fixtures to replace the single socket lights we had upstairs and we will be getting globes to match them.  But of course, they are not here yet.

By this time, I was SO excited, I started looking for anything else I could paint...I mean...it already stunk like paint...I might as well take advantage of the opportunity...especially since Marion said we would be getting icky weather in the next day or so...and what did my eye fall on but the brass lamp that was in the sitting room...

Brass lamp painted Nickle Silver
Yep, I took it outside and coated it down good...I'm really LOVING this stuff!

When Marion came home he was SO impressed he kissed me!

Now, just for the record, they make other Metallic Finishes in case you are not a silver lover like I am...they have brass and copper and I don't know what else...but lots of options.  As I was talking to Marion we decided that I probably saved us over $200 in 'replacement' purchases and can probably save more by buying another can and painting the handles in the kitchen instead of replacing them all!

Well, I better get back at putting the kitchen back together.  I got off on a bunny trail with the Metallic Paint...lol!

Copyright © 2012 All Rights Reserved MMFarmlife - Melanie Schlatter